- Sat 06 April 2024
- DevOps
- #flask, #kubernetes, #docker
This article is part of a series.
Getting into Docker & Kubernetes
TL;DR
Yes - with some work.
Here are the steps:
- Install Kompose - a conversion tool that allows you to convert your Docker Compose code to Kubernetes configuration files
- Run
kompose convertin the same directory as yourdocker-compose.ymlto generate the config files for your Kubernetes cluster
- Run
- Install Minicube - a tool that allows us to spin up a Kubernetes cluster in a local machine
- Run
minikube startto start your Kubernetes cluster - Run
minikube dashboardto spin up a web-based user interface that allows you to manage your Kubernetes cluster
- Run
- Install kubectl - a CLI tool provided by Kubernetes for communicating with a Kubernetes cluster's control plane using the Kubernetes API
- Run
kubectl apply -f <filename>to apply your services/deployments
- Run
Let's consider the following scenario - our application has gained popularity and is attracting a large number of users and, to keep up with that, we need a way of handling increased traffic.
We could vertically scale - that is, allocate more resources to our containers:

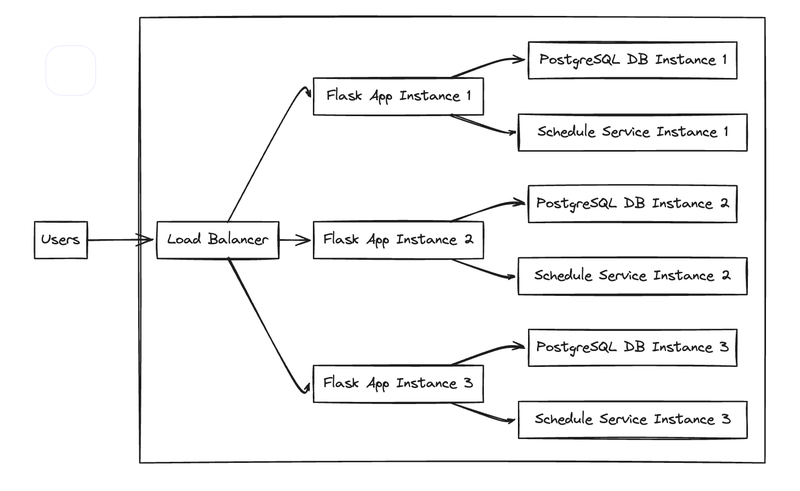
But instead, we want to horizontally scale it by creating multiple copies of the containers and distributing traffic among them:

And as you probably guessed by the title of this post, we're going to use Kubernetes for that.
Wait... isn't Kubernetes and Docker the same thing?
Not really. Docker focuses on creating and running containers, while Kubernetes is a container orchestration platform that manages the deployment, scaling, and operations of those containers in a cluster.
You can think of Docker as the chef who prepares individual dishes (containers) in the kitchen, ensuring they're well-packaged and portable, while Kubernetes serves as the restaurant manager who orchestrates the dining experience, seating guests (users) at tables (containers), coordinating servers (nodes), and managing the overall flow of the restaurant to ensure a delightful dining service..
What is Kubernetes?
Kubernetes, often referred to as k8s, is an open-source container orchestration engine designed to automate the deployment, scaling, and management of containerized applications. It aims to simplify application management, ensure high availability via replica sets, and facilitate scalability.
By abstracting the underlying infrastructure, Kubernetes offers a declarative approach to define the desired state of applications and their dependencies using YAML files.
Kubernetes' architecture
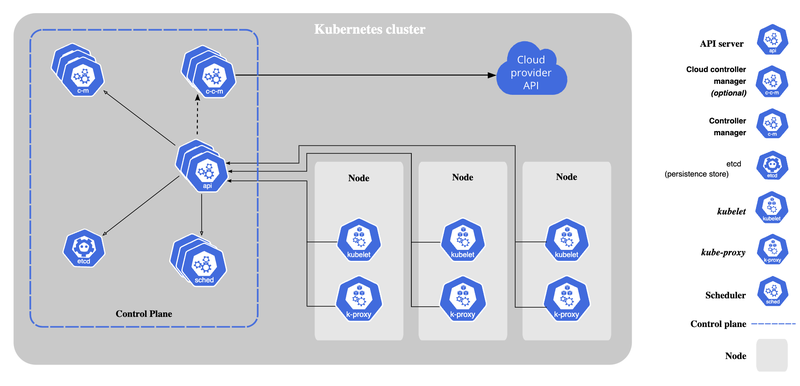
Deploying Kubernetes creates a cluster, consisting of worker nodes running containerized applications. Each cluster has at least one worker node, hosting Pods, which form the application workload. The control plane manages these nodes and Pods. In production, the control plane typically runs across multiple computers for fault-tolerance and high availability.

Let's take a quick look at Kubernetes' main components.
Control Plane:
- kube-apiserver: Exposes the Kubernetes API for cluster management
- etcd: Stores all cluster data reliably
- kube-scheduler: Assigns nodes for newly created Pods
- kube-controller-manager: Runs controller processes to manage cluster state.
- cloud-controller-manager: Integrates cloud-specific control logic (if applicable).
Node:
- kubelet Ensures containers described in PodSpecs are running and healthy.
- kube-proxy: Maintains network rules for network communication to Pods.
- Container runtime: Manages execution and lifecycle of containers within Kubernetes.
You can learn more about it on Kubernete's official page.
Getting to work
Enough theory, let's get to work.
For this experiment, we're going to need three tools:
- Kompose - a conversion tool that allows us to convert our Docker Compose code to Kubernetes configuration files
- Minicube - a tool that allows us to spin up a Kubernetes cluster in a local machine
- kubectl - a CLI tool provided by Kubernetes for communicating with a Kubernetes cluster's control plane using the Kubernetes API
Converting our docker-compose.yml file
Once we have all of those installed, we will start converting our docker-compose file running kompose convert in the same directory as our docker-compose.yml file.
A few files were created in that directory:
- env-configmap.yaml
- mongo-db-claim0-persistentvolumeclaim.yaml
- mongo-db-claim1-persistentvolumeclaim.yaml
- mongo-db-service.yaml
- mongo-db-deployment.yaml
- app-service.yaml
- app-deployment.yaml
- schedule-service-claim0-persistentvolumeclaim.yaml
- schedule-service-claim1-persistentvolumeclaim.yaml
- schedule-service-service.yaml
- schedule-service-deployment.yaml
Firing it all up
I am not super familiar with Helm but I think one of its features is to manage dependencies between those files, allowing us to run all of them in a docker-compose up style.
For this post, let's do everything manually and cover the details on the app files.
We'll start exposing our variables:
- kubectl apply -f env-configmap.yaml
Then spinning up up our Mongo DB service running:
- kubectl apply -f mongo-db-claim0-persistentvolumeclaim.yaml
- kubectl apply -f mongo-db-claim1-persistentvolumeclaim.yaml
- kubectl apply -f mongo-db-service.yaml
- kubectl apply -f mongo-db-deployment.yaml
And now, we can spin up our Flask application:
- kubectl apply -f app-service.yaml
- kubectl apply -f app-deployment.yaml
Let's take a deeper looker into these two files files:
app-service.yaml:
apiVersion: v1
kind: Service
metadata:
  annotations:
    kompose.cmd: kompose convert
    kompose.version: 1.32.0 (HEAD)
  labels:
    io.kompose.service: app
  name: app
spec:
  ports:
    - name: '8001'
      port: 8001
      targetPort: 8001
  selector:
    io.kompose.service: app
app-deployment.yaml:
apiVersion: apps/v1
kind: Deployment
metadata:
  annotations:
    kompose.cmd: kompose convert
    kompose.version: 1.32.0 (HEAD)
  labels:
    io.kompose.service: app
  name: app
spec:
  replicas: 3
  selector:
    matchLabels:
      io.kompose.service: app
  template:
    metadata:
      annotations:
        kompose.cmd: kompose convert
        kompose.version: 1.32.0 (HEAD)
      labels:
        io.kompose.network/test-kompose-my-network: 'true'
        io.kompose.service: app
    spec:
      containers:
        - args:
            - flask
            - run
            - '--host'
            - 0.0.0.0
            - '--port'
            - '8001'
          env:
            - name: ENV
              valueFrom:
                configMapKeyRef:
                  key: ENV
                  name: env
            - name: FLASK_SECRET_KEY
              valueFrom:
                configMapKeyRef:
                  key: FLASK_SECRET_KEY
                  name: env
            - name: MONGO_INITDB_DATABASE
              valueFrom:
                configMapKeyRef:
                  key: MONGO_INITDB_DATABASE
                  name: env
            - name: MONGO_INITDB_ROOT_PASSWORD
              valueFrom:
                configMapKeyRef:
                  key: MONGO_INITDB_ROOT_PASSWORD
                  name: env
            - name: MONGO_INITDB_ROOT_USERNAME
              valueFrom:
                configMapKeyRef:
                  key: MONGO_INITDB_ROOT_USERNAME
                  name: env
            - name: MONGO_PASSWORD
              valueFrom:
                configMapKeyRef:
                  key: MONGO_PASSWORD
                  name: env
            - name: MONGO_USER
              valueFrom:
                configMapKeyRef:
                  key: MONGO_USER
                  name: env
            - name: QUOTES_APP_MONGO_CONN
              valueFrom:
                configMapKeyRef:
                  key: QUOTES_APP_MONGO_CONN
                  name: env
            - name: SENDGRID_API_KEY
              valueFrom:
                configMapKeyRef:
                  key: SENDGRID_API_KEY
                  name: env
          image: local-app-image
          imagePullPolicy: IfNotPresent
          name: my-app
          ports:
            - containerPort: 8001
              hostPort: 8001
              protocol: TCP
      restartPolicy: Always
Most parameters here are self-explanatory, but I want to highlight two of them:
imagePullPolicy- we need to set that toNeverorIfNotPresentif we intend to run images we built locally. We also need to runeval $(minikube docker-env)in the same terminal I'm runningkubectlcommands as stated in the official documentationreplicas- we can choose the number of containers we want to spin up (nifty stuff)
Lastly, we spin up the schedule service:
- kubectl apply -f schedule-service-claim0-persistentvolumeclaim.yaml
- kubectl apply -f schedule-service-claim1-persistentvolumeclaim.yaml
- kubectl apply -f schedule-service-service.yaml
- kubectl apply -f schedule-service-deployment.yaml
Taking a look at our creation
To see what we just did, we could go old school with kubectl get pods (and some other commands) on the terminal.
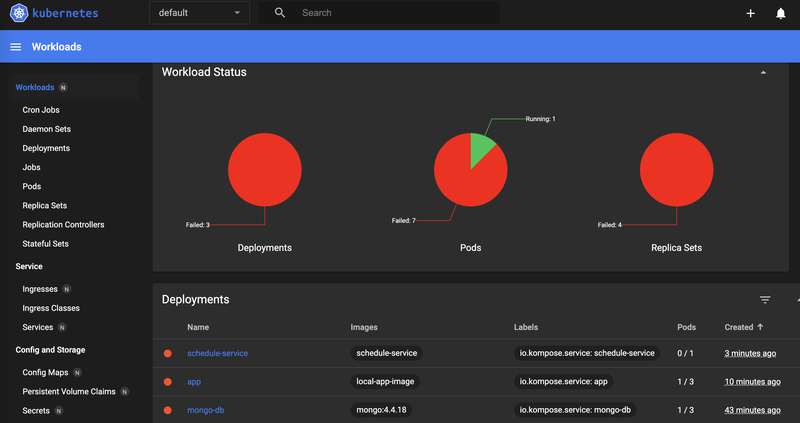
But Minikube has a web-based user interface that allows us to manage our Kubernetes'cluster in the browser. We can simply run minikube dashboard and go to this link on any browser.

Here are some of the things we can do in that dashboard:
- Monitor the health of our applications and cluster
- Create, view, update, and delete Kubernetes resources
- View logs of our applications
- Access and manage secrets, config maps, and other configurations.
- Debug applications directly from the dashboard
Final thoughts
Many folks find Kubernetes to be complex, and some even say that those who praise it might not actually use it regularly.
Although Kubernetes has become easier to use in some ways, setting it up still needs some previous knowledge, especially when it comes to configuring networks for load balancers to handle pods replicas correctly.
But it's pretty amazing how quickly you can get a Kubernetes environment running on your own computer. This is super helpful when you're ready to move our applications to platforms like AWS EKS - it makes testing and development easier and sets you up for a smoother deployment in the real world.